Showing posts with label Breads. Show all posts

Maple Corn Bread

November 8, 2010


Maple Corn Bread

1 1/4 cups flour
1/4 cup corn meal
1/2 Tbl baking powder
1/2 tsp salt
1 egg
3/4 cup milk
1/2 cup maple syrup
3 Tbl canola oil

To Prepare:
In a bowl, combine flour, corn meal, baking powder and salt. In a separate bowl, beat egg, milk, syrup and oil. Stir into dry ingredients, just until moistened. Pour into a greased 9-inch square baking pan. Bake at 400° for 20 to 22 minutes. Cut into squares. Serve warm.

To Freeze:
Remove corn bread from pan. While still warm, wrap loaf in extra heavy foil. Or, place individual pieces in sandwich bags and freeze together in a gallon freezer bag. Label and freeze.

To Serve:
Thaw and serve. Heat briefly, if desired.

Read more...

Freezing Bread

September 13, 2010


All bread products freeze beautifully. From pitas to tortillas to regular loaves. Here are some tips on freezing loaves of bread.

If you've just baked your own bread or purchased it warm, make sure you allow it to cool before freezing to avoid soggy bread or mold.

To Freeze. Wrap your loaf using two clear plastic bags. Then, seal it using masking tape and place it in the freezer.

To thaw your frozen bread, take it out of the freezer and let it come to room temperature, about 3 hours.
To serve the bread hot, wrap your bread in parchment paper and foil and place it in an oven heated to 400 degrees for 3 or 4 minutes to restore its crisp texture.

Read more...

Cranberry Orange Scones

May 3, 2010

This week's recipe is courtesy of Ina Garten (a.k.a. "The Barefoot Contessa") from Food Network. My daughter and I watched this episode and practically shorted out the TV remote with drool. These look delicious! And they also received a solid 5 stars from Food Network viewers who have tried the recipe.

This recipe brings to mind two great tips for Freezer Cooking...

Tip 1: Pretty much every bread recipe freezes well

Tip 2: If you watch cooking shows keep a listening ear tuned to the host suggesting freezing. Ina mentioned freezing this dough ahead and baking it as needed.


CRANBERRY ORANGE SCONES
Recipe by Ina Garten

4 cups plus 1/4 cup all-purpose flour
1/4 cup sugar, plus additional for sprinkling
2 tablespoons baking powder
2 teaspoons kosher salt
1 tablespoon grated orange zest
3/4 pound cold unsalted butter, diced
4 extra-large eggs, lightly beaten
1 cup cold heavy cream
1 cup dried cranberries
1 egg beaten with 2 tablespoons water or milk, for egg wash


To Prepare
- In the bowl of an electric mixer fitted with a paddle attachment, mix 4 cups of flour, 1/4 cup sugar, the baking powder, salt and orange zest.
- Add the cold butter and mix at the lowest speed until the butter is the size of peas.
- Combine the eggs and heavy cream and, with the mixer on low speed, slowly pour into the flour and butter mixture. Mix until just blended. The dough will look lumpy!
- Combine the dried cranberries and 1/4 cup of flour, add to the dough, and mix on low speed until blended.
- Dump the dough onto a well-floured surface and knead it into a ball. Flour your hands and a rolling pin and roll the dough 3/4-inch thick. You should see small bits of butter in the dough. Keep moving the dough on the floured board so it doesn't stick.
- Flour a 3-inch round plain or fluted cutter and cut circles of dough. You can also choose to cut them into more traditional triangle shapes with a sharp knife.
- Place the scones on a baking pan lined with parchment paper. Collect the scraps neatly, roll them out, and cut more circles.
- Brush the tops of the scones with egg wash, sprinkle with sugar.
- Flash freeze raw scones on a cookie sheet and transfer to gallon size ziplock bag when completely frozen.

To Bake
- Bake at 400* for 25 to 30 minutes, until the tops are browned and the insides are fully baked. The scones will be firm to the touch. Allow the scones to cool for 15 minutes.

Optional Glaze
- Whisk together 1/2 cup confectioners' sugar and 4 teaspoons freshly squeezed orange juice and drizzle over the scones.

Read more...

Freeze Ahead Already Baked Dinner Rolls

February 1, 2010

I know many people who are cooking for just one or two. Making homemade rolls can be tough when you only need a few and don't want the rest to go to waste. This recipe from America's Test Kitchen (available for free on their website) promises fresh baked rolls anytime and you can break off as many or as few as you would like and leave the remaining rolls frozen for another time. These are rolls that you cook and THEN freeze...reheating when ready. Later this month I will post a recipe to make your own dough balls (like Rhodes rolls).


Freeze Ahead Dinner Rolls
Makes 15 large rolls.

Ingredients
3 tablespoons unsalted butter , plus 2 tablespoons for bowl and baking dish
1 1/2 cups whole milk
1/3 cup honey
4 tablespoons vegetable shortening
5-5 1/2 cups all-purpose flour
1 tablespoon yeast (rapid rise or instant)
2 teaspoons salt
1 large egg , plus1 large egg beaten with 1 tablespoon water

Instructions
1. Adjust oven rack to middle position and heat oven to 200 degrees. When oven reaches 200 degrees, shut oven off. Grease large bowl with 1 tablespoon butter. Line 13 by 9-inch baking dish with foil, leaving overhang on all sides. Grease foil with 1 tablespoon butter.

2. Place milk, honey, shortening, and remaining 3 tablespoons butter in large measuring cup. Microwave on high power until milk is warm (110 degrees) and butter and shortening begin to melt, 1 to 2 minutes. Stir well. Don't get the milk mixture too hot, or the dough won't rise.

3. Mix 4 1/2 cups flour, yeast, and salt in bowl of standing mixer fitted with dough hook. Turn mixer to low and slowly add milk mixture. After dough comes together, increase speed to medium, add 1 egg, and mix until dough is smooth, about 2 minutes. Add another 1/2 cup flour and knead until dough is shiny and smooth and comes away from sides of mixing bowl, 6 to 7 minutes (add up to 1/2 cup more flour if dough is too sticky). Turn dough onto unfloured surface and knead briefly to form smooth, cohesive ball. Transfer dough to buttered bowl and turn to coat. Cover bowl with plastic wrap and place in turned-off oven until dough has doubled in size, 50 to 60 minutes.

4. Punch down dough on floured surface and divide into 3 equal pieces. Roll each piece into thick cylinder and cut each cylinder into 5 equal pieces. Working one piece at a time (keep remaining pieces covered with plastic wrap) and following photos, form dough pieces into smooth, taut rounds and arrange in prepared baking dish. Lightly press on dough rounds so they just touch each other. Cover baking dish with plastic wrap and return to turned-off oven until dough rounds have doubled in size, 50 to 60 minutes.

5. Remove dish from oven and heat oven to 375 degrees. Unwrap baking dish and brush rolls with egg-water mixture. Bake until rolls are deep golden brown, 25 to 27 minutes. Remove from oven and cool on wire rack for 5 minutes. Using handles of foil sling, remove rolls from baking dish and cool on wire rack for 1 hour. Remove foil from rolls, return to rack, and cool completely.

To Freeze
Keeping rolls together or seperating into individual serving sizes, wrap tightly in plastic wrap, then in foil; freeze for up to 1 month.

To Serve
Remove plastic wrap and foil (reserve foil) from rolls, wrap in reserved foil, and defrost at room temperature for 2 hours. Adjust oven rack to middle position and heat oven to 375 degrees. Bake foil-wrapped rolls on baking sheet until heated through, about 30 minutes. Serve.

Read more...

Triple Chocolate Muffins

January 4, 2010

It's been a while since I featured a breakfast recipe. We all hear a million times over that breakfast should not ever be skipped. And maybe the fact that this is a chocolate muffin negates the health benefits of not skipping breakfast, but I choose to overlook that fact.


TRIPLE CHOCOLATE MUFFINS
Yield: 12 muffins

5 ounces Semisweet Chocolate
2 Baking Chocolate Squares
1/3 cup Butter
3/4 cup Sour Cream
2/3 cup Brown Sugar - packed
1/4 cup Light Corn Syrup
1 Egg
2 teaspoons Vanilla
1 1/2 cups Flour
1 teaspoon Baking Soda
1/4 teaspoon Salt
1/2 cup Chocolate Chips - semi-sweet or milk

To Prepare
- Mix semisweet chocolate, baking chocolate, and butter together, then melt carefully in microwave or over simmering water in double boiler. Allow to cool to lukewarm.
- Mix sour cream, sugar, corn syrup, egg and vanilla. Blend with melted chocolates. Blend flour, soda and salt, then add to the chocolate mixture and blend very well. Add the chocolate chips.
- Pour batter into 12 paper-lined or greased muffin tins.
- Bake in preheated 400 degree F oven for about 20 minutes. Remove from muffin tins and allow to cool on wire racks.

To Freeze
Cool completely, then freeze in individual baggies, removing as much air as possible from each baggie before sealing.

To Serve
Reheat in microwave for 15-20 seconds or until just slightly warm.

Read more...

Savory Breakfast Muffins

June 1, 2009

I found this recipe online and tried it out. It was fabulous!
It was originally posted by Lightly Toasted on Recipe Zaar.

I love the idea that you have filling and hot breakfast ready in just seconds for those morning when everybody is rushing out the door. I am going to make a bunch of these (with ham instead of sausage) for ballet mornings at my house when I am prone to grab a bagel sandwich at McDonalds.


Savory Breakfast Muffins

makes 10 jumbo muffins

1 lb chorizo sausage or bulk breakfast sausage
2 cups Bisquick
1 cup cornmeal
3 eggs
1 3/4 cups milk
1/4 c. chopped green or red bell pepper
1/2 c. finely minced onion
1/2 tsp. salt
pepper to taste
1/4 tsp. garlic powder
1 1/2 cups shredded cheddar cheese


To Prepare

1. Line muffin tins with paper liners, and set aside.
2. Fry, crumble and drain sausage. (omit this step if using ham)
3. Preheat oven to 375 degrees.
4. Mix together bisquick, cornmeal, eggs, garlic powder and milk.
5. Add drained sausage, diced peppers, onions and cheese. Stir well. (You may choose to saute the peppers and onion with your sausage for a milder taste).
6. Ladle the filling into the prepared muffin tins, filling almost to top.
7. Bake for 11-15 minutes. Allow to cool completely.


To Freeze

- Store in freezer in a large airtight container. Or place each in a sandwich bag, and then place a dozen in a large ziploc bag.


To Serve

- Microwave on high for approx 90 seconds.

Read more...

Make Ahead Garlic Bread

April 13, 2009

I have a confession to make.
I am addicted to simple carbs.
This means I could conceivably consume a year's worth of carbs in one meal when pairing great pasta and a loaf of garlic bread. This not only leads to perpetual chubbiness, but also a wide-spread family panic if pasta is made for dinner and no garlic bread is on hand. Hence, this simple recipe.


GARLIC BREAD


Ingredients:
1 loaf French bread
8 Tbsp butter, room temp.
2 cloves (or 2 tsp.) minced garlic
1/2 c. grated Parmesan cheese
2 tbs dried Italian Seasoning (optional)

To Prepare:
- Slice bread lengthwise.
- In a medium bowl, combine the butter, Italian seasoning and garlic. Mix well.
- Spread each cut side of the bread with the butter mixture.
- Sprinkle 1/4 c. Parmesan cheese over each sides of the bread. Put loaf back together, butter sides together.
- Wrap loaf in tin foil. Label and freeze for up to one month.

To Serve:
- Loosen the foil and bake at 400* for 15 minutes.
- Open up the bread so the cut sides are exposed and cook for approximately 15 more minutes.
- Slice and serve.

Single Servings:
If cooking for one or two, slice loaf into 1 inch slices instead of lengthwise. Add butter mixture to each slice and place sheets of wax paper between slices before freezing. Remove just enough servings and bake, butter side up, on baking sheet at 400* for 5-7 minutes.
.

Read more...

Muffins in a Minute

February 9, 2009

Ready for a great breakfast and brunch recipe?
Here ya go!

Freezer Muffins


3 c. flour
1 T. baking powder
1/2 tsp. baking soda
1/2 tsp. salt
10 Tbsp. unsalted butter, softened (1&1/4 sticks)
1 c. sugar
2 large eggs
1&1/2 c. plain whole milk yogurt

- Whisk or sift together flour baking powder, baking soda and salt.
- In separate bowl beat butter and sugar together until fluffy. Add eggs one at a time. Add yogurt.
- Combine wet and dry ingredients. Add *extras.

To freeze:
- Spray muffin tin with cooking spray. Fill each muffin cup 2/3rds full.
- Wrap tightly in plastic wrap and freeze. Once the raw batter is completely frozen, remove from pan and store in large ziplock bag.

To bake:
- Adjust oven rack to lower middle position.
- Spray muffin tin with cooking spray or line cups with muffin papers.
- Place frozen batter into each cup.
- Bake @ 375* for 35-40 minutes.


*VARIATIONS

Blueberry Muffins: Add 2 c. fresh blueberries (tossed in 1 T. flour) to batter before freezing.
Cranberry-Orange Muffins: Add 1&1/2 c. fresh chopped cranberries and 1 tsp. grated orange zest into batter before freezing.
Lemon-Poppy Seed Muffins: Add 2&1/2 tsp. poppy seed and 1&1/2 grated lemon zest into batter before freezing.

Read more...

Breadsticks to die for

November 10, 2008

Remember the last post about my love affair with Puff Pastry?
Get ready to fall in love too.

Freezing Happy is not just about pulling completely meals from the freezer.
It's about having a freezer filled with a arsenal of tools to make your life easier in a variety of different ways.

So on a Monday night when you have not yet recovered from the weekend, you can make an easy and complete meal by boiling some pasta, adding your favorite jarred sauce, a green salad and whipping a few of these amazing, melt in your mouth breadsticks from the freezer to complete your meal. Or serve them as an accompaniment to a large dinner salad.

Freezy Cheese Straws


1 (9.5x9") sheet frozen puff pastry, thawed on counter for 10 minutes.
2 ounces grated *real Parmesan cheese (about 1 cup)
1/4 tsp salt
1/4 tsp. fresh ground black pepper.

- Line counter top with silpat or wax paper.
- Unwrap slightly thawed puff pastry sheet and spread open.
- Sprinkle with 1/2 grated parmesan, salt and pepper
- Cover with second layer of waxed paper and use a rolling pin to lightly press down to press cheese into dough.
- Flip the dough over, carefully remove top layer of wax paper and repeat with remaining half of ingredients.
- Replace wax paper and roll until the dough is 10.5" square.
- Remove top layer of wax paper and use a pizza cutter to slice long strips that are 3/4" wide.
- Gently twist each strip and then place it onto a silpat lined baking sheet, 1 inch apart.

To freeze: wrap baking sheet with plastic wrap and freeze for at least 2 hours and up to 24 hours. Remove from pan and place in a gallon freezer bag.

To Bake:
- Place needed amount of cheese straws onto silpat lined baking sheet.
- Bake at 425* for 8-12 minutes or until golden brown. Let cool and serve.


*Tip: How to tell it's real Parmesan.


Real Parmesan cheese will have a stamp on the rind made of many small pinholes as shown above. Fake domestic Parmesan may have a rough looking rind, but if there is no stamp...it's not going to be as good. If the real stuff is too expensive for you, go with the domestic DiGiorno brand. I guess you can try using the grodey powdery can stuff, but it's not going to compliment the buttery goodness of the puff pastry and I'll probably be a bit mad at you.
.
.

Read more...

Mini Pancakes

June 26, 2008

This is a great recipe to start off your freezing with. It's easy, cheap and the kids just LOVE 'em! And I do too.

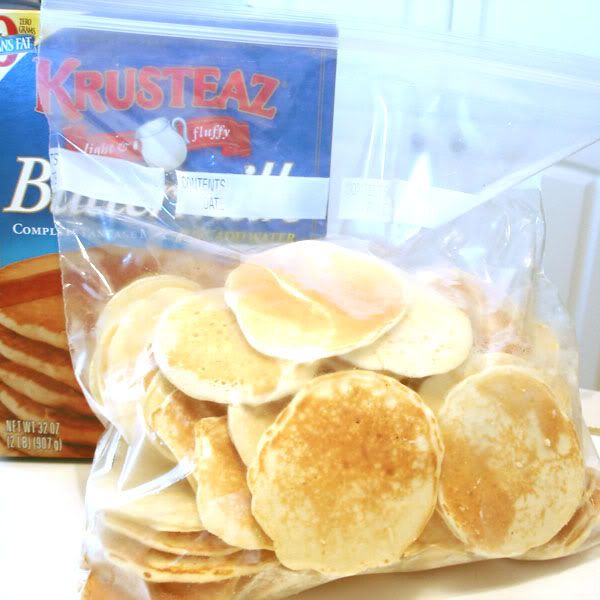
Start out with making standard pancake mix. I usually triple the batch amount. My kids really love these. Use whichever mix or recipe you like. Whole Wheat, vegan, whatever. My favorite is Krusteaz. Just add water? Perfect!


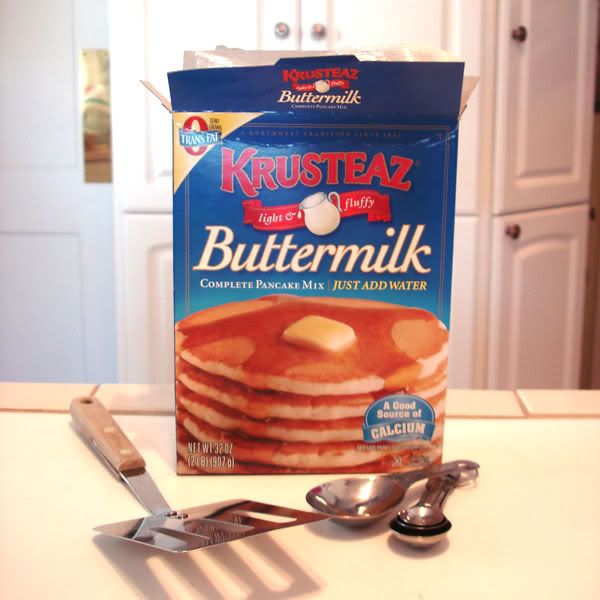
You'll also need a cookie sheet, measuring spoons and a silpat mat. Heat your griddle to 350* or a frying pan to medium/high. To make mini pancakes just scoop out circles, 1 Tbsp at a time. When I do this on a griddle I leave one row open so I can flip more easily.


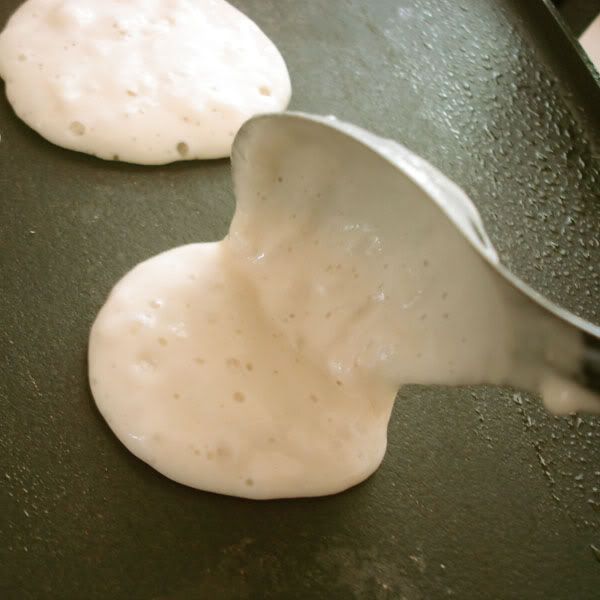
By the time you have scooped out an entire griddles worth, the first rows should be about ready to flip. Flip them when most of the surface is covered with bubbles.

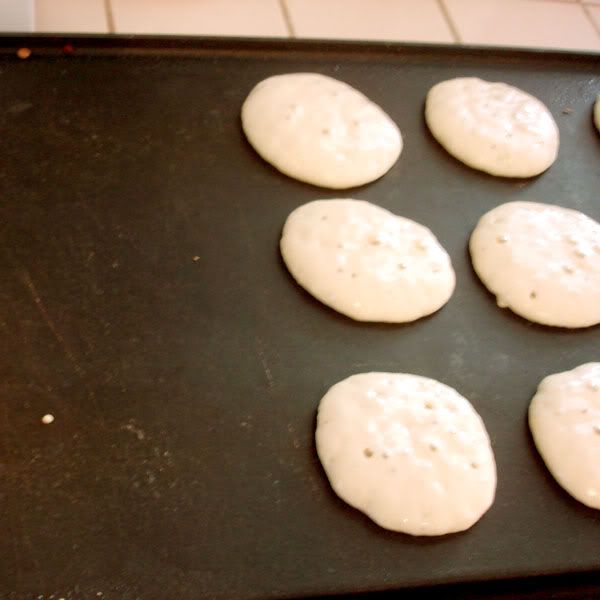
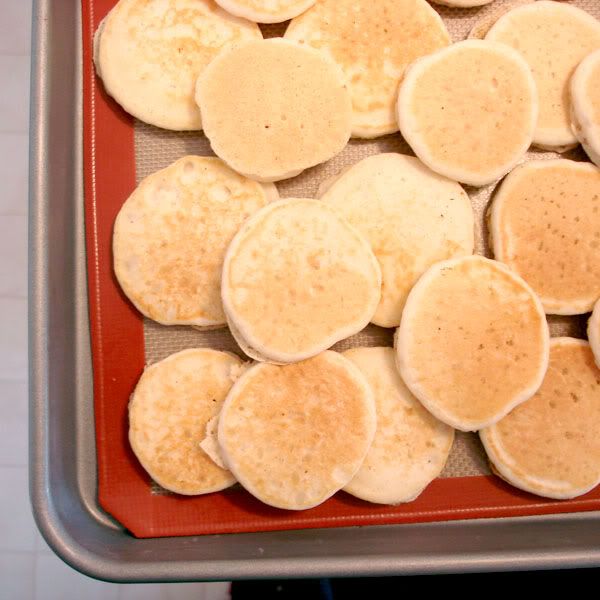
Then line remove them from griddle and place them straight onto a cookie sheet lined with a Silpat. You may place them close together. Continue making mini pancakes and piling them on until all of your mix is used up...adding additional layers on your baking sheet.


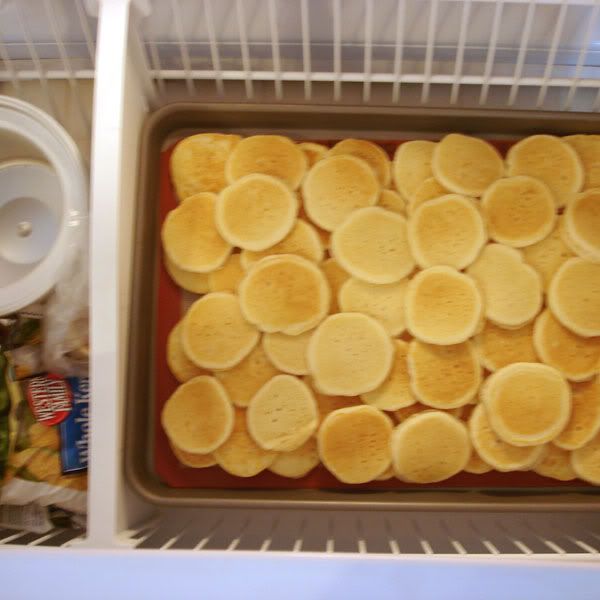
Place baking sheet into the freezer (uncovered) to flash freeze for 1 hour.


Remove from freezer and place mini pancakes into a gallon size freezer bag, label and store.


To reheat:
Place desired amount of pancakes in one layer on a microwave safe plate or a paper towel. Cook for 5 second increments, checking for warmth after each 5 seconds until all are warmed through.
I like to serve these with two little bowls for kids to dip in. One of maple syrup and one with raspberry jam. We have also taken these on the road with our kids and made a little sandwich out of two pancakes with a bit of sugar free jam in the middle. Delicious!


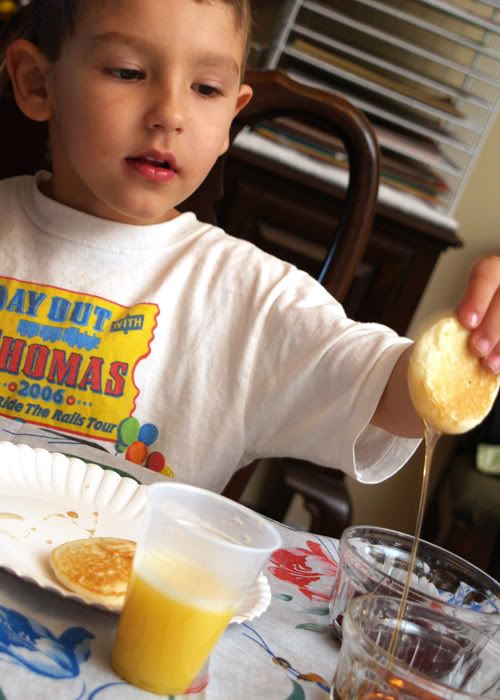
Our friend Bradley, enjoying the dipping.

Note: You can totally make these into "adult size" pancakes and flash freeze them just the same way. Store in a ziplock bag with pieces of wax paper in between each pancake. But seriously...why would you when the mini pancakes are so cute?

Read more...
Related Posts with Thumbnails

About This Blog

A new recipe will be posted each Monday and, of course, you can always search the archives by category.

The Goal of this blog is not just to give you my recipes, but to teach you which ingredients freeze well, which don't, methods and tips to help you freeze your own recipes...because who knows better what your family likes than you?

Do you only cook organic? Great! Are you a vegetarian? No problem! Make what works for you and save time, money and (let's be honest...stress) while doing it.

The Freeze Happy philosophy has made my life better and I'm pretty sure it can improve yours too.

Legal Stuff

Copyright © 2008-2010 Emilie Ahern. The content on these pages, including text and images are the sole property of the author unless otherwise noted and may not be used or reproduced in any manner without consent. All Rights Reserved.

  © Blogger template On The Road by Ourblogtemplates.com 2009

Back to TOP